Organize Folders
MapProvision allows you to organize the way that your spatial layers are arranged in the layer tree
in the Viewer.
To launch the Organize Folders tool click the Organize Folders button in your Data Collection's Manager mode.

You can drag and drop items, rename items, and create and name new folders to organize your layers.
The organization that you configure in the Organize Folders tool will be used when displaying the layers in
the layer tree in the Data Collections Viewer portal.
In addition to dragging and dropping your layers to different positions and folders there
are the following operations available.
 New Folder: This creates a new folder at the selected position in the tree. New Folder: This creates a new folder at the selected position in the tree.- New Root Folder: This creates a new folder at in the top level of the tree.
 Undo Recent Changes: This undoes all your current changes and reloads the tree to how it was configured, prior to launching the Organizer. Undo Recent Changes: This undoes all your current changes and reloads the tree to how it was configured, prior to launching the Organizer. Restore to default: This resets any changes you have ever made to the tree and restores all the layers to the default position where they are organized into their respective layer type folders. Restore to default: This resets any changes you have ever made to the tree and restores all the layers to the default position where they are organized into their respective layer type folders. Rename: This puts the selected item or folder into edit mode where you can give it a new name. Rename: This puts the selected item or folder into edit mode where you can give it a new name. Remove: This removes the selected item layer from the tree, it does not delete the dataset itself. Remove: This removes the selected item layer from the tree, it does not delete the dataset itself.
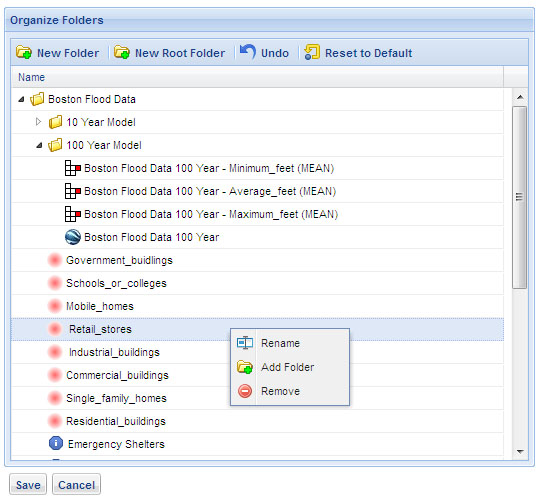
There is a tree menu you can use to rename, add folders and remove items by right clicking at the selected location.
Once you are happy with the changes you can select save and the changes will now dictate how the spatial layers
are arranged in the Viewer.
You can refresh the Viewer tree, or open it if it is not already open to see your layers rearranged with the new
tree layout.
|